|
|
||
|---|---|---|
| app | ||
| docs | ||
| files | ||
| log | ||
| .dockerignore | ||
| .gitignore | ||
| .python-version | ||
| Dockerfile | ||
| LICENSE | ||
| README.md | ||
| diagramming-apache-site.example.conf | ||
| docker-compose.yml | ||
| poetry.lock | ||
| pyproject.toml | ||
README.md
Annotated Vector Drawing Animations
Getting Started • Usage • License • Credits • Citation
This software allows for drawings to be made and played back in a time-based format. Additionally, it contains tools to create excerpts of the drawings and browse these segments by annotation.
This software was developed in light of a research project in which we used it in an interview setting. Asking speakers not just to speak, but to draw the entities they mention and the relations between them. This adds a visual layer on top of the audio.
For more information on the rationale behind developing this tool, see the citation section.
Getting Started
These instructions will give you a copy of the project up and running on your local machine for development and testing purposes. See deployment for notes on deploying the project on a live system.
Prerequisites
The easiest way to run svganim is with docker-compose. Alternatively you can choose set up your own python environment. If you do so, ffmpeg is required.
Installation
git clonethis repository.cdinto the folder and rundocker-compose builddocker-compose up -d- Docker should now expose the service at port 7890. Edit docker-compose.yml to change this.
Alternatively, you can set up the environment using poetry.
cd apppoetry installto install dependencies.poetry run python webserver.py --storage ../file
Update
git pullthe new revision- rerun
docker-compose buildto rebuild the image - rerun
docker-compose up -dto restart the container
Deployment
The server is best exposed through a proxy. An example Apache configuration file is included.
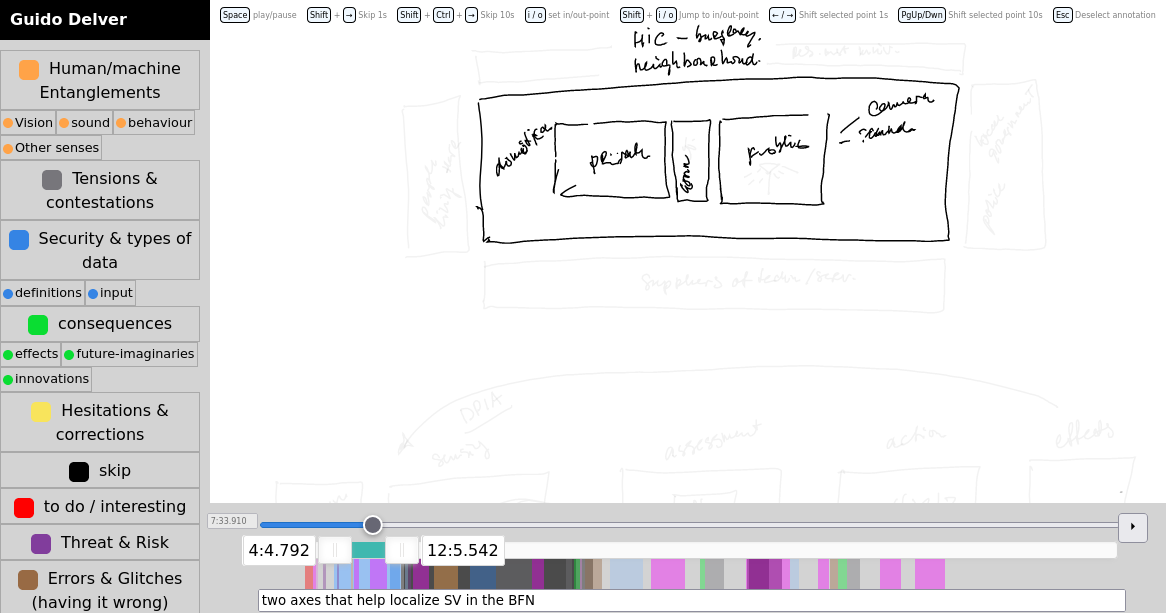
Usage
When the service runs, open it using your browser. The first page shows three options:
- Tags -- Manage a set of tags for annotating.
- Drawings -- All recorded drawings to be played back and annotated (or removed).
- Draw -- start drawing a diagram.
Drawing
-
By default, the drawing page gives four colour options. Select the desired colour on the left.
-
The big 'Fullscreen' button puts the canvas in fullscreen. To exit, use the escape key.
-
The drawing will be recorded from the moment the pen touches the canvas.
-
When you stop drawing (ie. close the tab or browser) you can recover the drawing by going to 'Drawings' and select 'Draw' at the drawing you want to continue.
- NOTE Please note that when continuing a drawing, the intermediate time is not captured. Ie. the last stroke of the first drawing, will be immediately followed by the first stroke from the second drawing.
-
A pen display such as a Wacom or Huion is recommended but not at all required.
Annotating
- Before annotating, make sure to configure your initial tags on the tags page (
URL/index) - [optional] Add audio
- add an audio recording of the conversation to
files/audio. Note that a wav file can be quite slow as everything goes through a browser. So possibly convert wav to mp3 or ogg. - Open the drawing in the interface URL/annotate.html. Hover the title on the top left, and select the audio file from the pull down.
- Use the Offset parameter to align the audio to the drawing (number in seconds).
- NOTE The diagram starts recoding on the first stroke. Often the audio file starts before the drawing. This requires a negative offset.
- add an audio recording of the conversation to
- The title of the drawing can be set and changed by clicking on it.
- To annotate, select an in and out point using the bar below the drawing.
- Alternatively, in and out point can be set to the playhead
iandokeys. - When the in or out point is selected, it can be moved wit the arrow keys, or page up/down for larger increments.
- To precisely enter a timecode, click the time label of the point to type it.
- Alternatively, in and out point can be set to the playhead
- Then click the desired tag from the overview on the left.
- Creating an annotation, immediately deselects it, and sets the selected area to the time after annotation.
- Click an annotation to select it
- Use the textbox at the bottom to add a comment. This will be visible in the tags index page.
- After selecting an annotation, click it again to deselect. Alternatively, use the
esckey.- Deselecting an annotation sets the selected area to the time after it.
Tags
With the tags interface you can manage a nested set of tags and manage the annotated segments. In our workflow, we had annotated the interviews, but tweaked the terms to create interesting subsets of drawings.
- To create a nested tag, select a tag, and an 'add tag' option will appear.
- Double-click the title to rename.
- Use the bucket icon to remove a tag.
- Click the coloured square to tweak the colour.
- In the overview of excerpts, use the checkboxes to change the tags in batch.
- Clicking an excerpt plays it back.
Export as video
The tag index contains a download button which creates a zip file with all the required files for an embeddable player. There is however no integrated a way to export the excerpts to a video file. The easiest way to do so however is to make a screen capture of a part of your display.
E.g. on Linux: set the pulse default input device to the monitor of the speakers. Then use wf-recorder: wf-recorder -g"$(slurp)" -a -f recording.mp4
Notes
The parse_offsets.py script can be used to pad the diagram in order to sync it with the audio. This is necessary eg. after a network failure. It works by adding a line with the required offset to the .json_appendable-file. It dumps the output to the terminal. So use it with a redirect. E.g. python parse_offsets.py -i faulty_file.json_appendable > new_file.json_appendable.
License
This code is made available under the MIT license. For details see LICENSE.
Credits
This software uses (and for ease of use, redistributes) the noUiSlider and wnumb javascript libraries, developed by Léon Gersen. Also using the MIT License.
Citation
If you use this work in your research, please cite it using:
van de Ven, Ruben, and Ildikó Zonga Plájás. 2022. ‘Inconsistent Projections: Con-Figuring Security Vision through Diagramming’. A Peer-Reviewed Journal About 11(1): 50–65. https://doi.org/10.7146/aprja.v11i1.134306